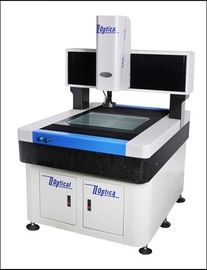
High Precision Image Tester 3D Optical Vision Measuring Machine Custom
Applicability:
3D Optical Precision Image Tester / Optical Vision Measuring Machine has adopted precision slant girder technology (Patented) designed by advanced F.E.M. (finite element method), which has the high precision, high performance and high steady characteristics. The machine’s perfect style, strong rigidity, lightweight and close frame movable bridge structure, which configured with the world famous high-quality specific 3-D CMM control system and the world highest level self-owned intellectual property of AC-DMIS software, makes it become the highly appreciated product by comparing with its competitive price and high practical quality. It will meet customer’s challenging demand with a comprehensive measurement solution.
Main Features of 3D Optical Precision Image Tester / Optical Vision Measuring Machine:
1. without a computer, connected directly to the monitor, there is quasi-cross line drawing function, with the data processor DC3000
2. capable of lines, circles, arcs, angle measurements, compared with conventional projectors, longer life, high-definition screen improve the measurement accuracy, continuous zoom (30-220 times)
3. High-precision granite base, column, table ensure very high stability and rigidity.
4. The two-table design, precision V-guide, and ensure a high mechanical precision.
5. precision friction drive, sensitive and reliable, no backlash, and fast-moving.
6. High-quality optical system and high-resolution CCD, to ensure a high quality measurement.
7. LED cold light annular surface contour and cold light source. Avoid heat deformation.
8. precision optical ruler with a resolution 0.001MM
Functions of 3D Optical Precision Image Tester / Optical Vision Measuring Machine:
1) Configuration of measuring environment parameter and movement parameter.
2) Probing system configuration and calibration.
3) Capture of measuring point.
4) Basic geometry element.
5) Element’s formation, transformation, review, projection, storage, transfer and relevant calculation.
6) Setup, storage and transformation of coordinate system and work piece coordinate system.
7) Assessment of dimension tolerance and position tolerance.
8) Store and input of measuring result file.
9) Import and convert CAD 3D model.
10) Coherence between Model coordinate system and part coordinate system.
11) Pickup of Features and curved surface points on the model.
12) Creation and measurement of section surface line.
13) Creation and measurement of curved surface.
14) Offline Programming based on CAD model.
Main Parameters of Optical Precision Image Tester / Optical Vision Measuring Machine:
|
Model:
|
HD-6050
|
|
Work table
|
Marble table size(mm)
|
930X850
|
|
Glass table size (mm)
|
760X650
|
|
Travel: X,Y (mm)
|
600X500
|
|
Travel: Z
|
230mm
|
|
Z Effective space:
|
200mm
|
|
Weight:
|
860kg
|
|
Dimension (mm):
|
1130X1050X1700
|
|
Work distance :95mm
|
X,Y,Z Data Resolution :0.5um
|
|
Image system
|
1. Camera: Color 1/3``CCD camera
2. Video magnification :33-195X
3. Optical Magnification :0.7X-4.5X
4. Object view-field:8.1-1.3mm( for the length of the diagonal )
5. The numerical errors of X, Y coordinates show=(3+L/200)um(L For the length of the product being tested,unit:mm)
6. Contour and surface illumination: Ring LED and brightness can be setup
|
|
Power supply
|
180V(AC)-260V(AC) 50Hz
|
|
Power
|
50W(without computer)
|
3D Optical Precision Image Tester / Optical Vision Measuring Machine view:


 Your message must be between 20-3,000 characters!
 Please check your E-mail!
  Your message must be between 20-3,000 characters!
 Please check your E-mail!


